Followers

Thursday 28 October 2010

My feet are killing me...

...after a wonderful girls day out.

Last year I couldn't go because the date clashed with something else but there was no way I was gonna miss out this year...a visit to Harrods.

I haven't been to Harrods since I was knee-high to a grass-hopper so all I had in mind was the images that I had seen over the years on the TV. It wasn't as packed as I thought it might be so myself and 3 friends from work were able to have a lovely wander round without losing each other LOL

None of us had a huge amount to spend but I was determined that I was gonna come home with a Christmas decoration from Harrods.
There was so much to see and the staff were wonderfully helpful. We just had a lovely day wandering around the store.
I loved the Christmas World section where all the decs were but was disappointed that they didn't have anything suitable for my colour scheme...never mind...in the Vintage section they had some decs with images from past years and I managed to get one for the year of my birth - result!!!
The food halls are amazing and it would have been so easy to splurge a load of money without even batting an eyelid.
Would you believe that this 'Palace' birthday cake was £4,000.

I really must make the effort to go into Town more often. I have always loved the way the large London stores prepare for Christmas.

I have had a wonderful day despite being shocked by some of the prices - £7.50 for a tiny cup of coffee and a coissant - now I'm about to put my feet up and just have a lazy evening........................

Wednesday 27 October 2010

Lots of pretty ribbons...

...to finish off the planner.

As you can see, my Christmas Planner is now decorated with a selection of pretty ribbons.

I wasn't sure how I was finally going to bind this book as everything was too thick for the BIA. Book rings had been the other option and that is what I went with.

The ribbons were from a variety of sources but I kept them all linked with the cover colour scheme...white organza with silver edging, red satin, red & green tartan, black organza, white satin with holly printed on it and black satin embroidered with silver "merry christmas". It's a while since I used book rings like this but it certainly works and I am very happy with the finished result.

You will be pleased to note that I have actually started to use the planner................

Sunday 24 October 2010

Thought you might like to see...

...a bit more detail.
As I said in my previous post - I haven't got a clue what colours I put together but they seem to work.
I did find it harder to match/blend colours as I don't use my Promarkers that often - my first thought is usually to grab the Copics.
I didn't want 'bright' but I did want 'traditional'...think it works.
One of the problems with my haphazard way of choosing colours is that if I wanted to do another one of these in a similar colour-way, I'd be stuck.
I love the way the reindeer came out but for the life of me, I'd never be able to find those colours again without a lot of 'hit & miss'.
Being so much more used to my Copics I found it difficult to find the right colours for shadows & shading.
I really do love using both my Copics & Promarkers - colouring in is so relaxing.
I think I'm gonna have to have a play to find the colours I have used as I think I'd like to pull out some of the elements from these pages to use as embellies once I have the photos in.
I think it is safe to say that most of my Christmas craftwork this year will involve colouring in...at least in some shape or form LOL

Saturday 23 October 2010

Christmas Planner 2010...

...done, and ready to help me get organised (be warned; long post - put the kettle on LOL).

About this time last year I made a Christmas Planner using some free printouts created by Jane Dean. All the printouts were designed so that they could be coloured in...a bit like having a grown-up colouring book LOL It was the first time that I had created a project using my Promarkers (other than a few cards, that is). At the time I was very pleased with the results and even more pleased when I received a comment from the Christmas Planner website to say that they were featuring my book on their site. I was so chuffed...it is a great site and there are so many great ideas for holiday planners over there.

I have a link to the site in the list of blogs/sites I like to visit and hop over there from time to time to see what's new. You will probably remember a a couple of posts ago that a visit to the site had lead me to a new place, The Shabby Art Boutique. The site is run by Kerryanne English and she has loads of great ideas for Christmas stuff...guess what I found - printouts for a Christmas planner...yippee!!!
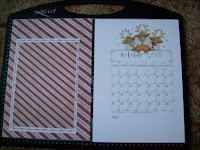
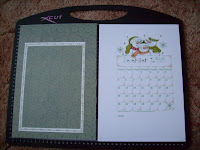
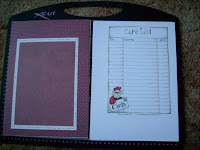
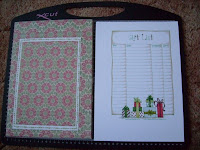
The covers for the planner have been made from chipboard (greyboard) covered in some wrapping paper that I had. The panel is white bazzill punched around the edge with one of my Martha Stewart 'Round the page' sets. Some red miri to matt & layer, the oval having been cut & embossed with the largest scalloped Nestie I have. Alphabet is Papermania glitterations. And the stamped image was one of my John Byar's stamps coloured using Copics.
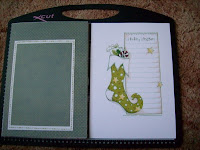
The pages are all free printables from Kerryanne's site that I have coloured using Promarkers. I printed the pages straight onto 290 weight white card.
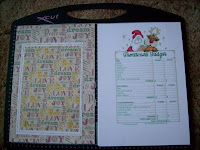
Once the images were coloured I covered the back with PP from the Papaermania "A Silent Night" A4 paper pack.
I had the same paper pack in A5 so I covered some C5 size white envelopes to match, doodled around the edge and then mounted to the page to create a pocket to store receipt/notes etc and provide a place to stick photos to later on.
I had a lovely time colouring in the images but I'm sorry to say I am not a very organised 'colourer' LOL I grab pens and colour/blend/shade as I go but rarely pay attention to the actual colours used. This means that I can never list the colours that I have used to creat an effect.
As I know that I don't pay much attention to the colours I have used I have at least learnt to colour everything that I want a particular colour - all in one go...if I was to go back to it later I wouldn't have a clue.
I didn't want any of the images too brightly coloured and I didn't want too many different colours as I already had the paper pack in mind when I started.
Kerryanne's artwork is lovely and I really enjoyed the time I spent bringing the printouts to life with my own choice of colours.
Hopefully this year I will be able to add lots of photos to the PP pages - last year my PC died and I lost a lot of my pics cos I had downloaded them from my camera and then deleted them from the memory card...fingers crossed for this year.
I had intended to bind this with my BIA but that is not going to happen. The chipboard I have used for the covers is too thick for my poor little 'blue guy' and I wouldn't want to damage the paper either by trying to wedge it in. In addition, because I have used 290 weight card for the pages and stuck PP & envelopes to them the whole thing is too thick for the 1.25" o-wires.

Never mind, I have some 2" book rings that I will be using and I have some lovely ribbons that I will use to decorate the rings.

This planner is much bigger than last year's and a lot heavier but I am really pleased with the way that it has turned out. Another thing that I noticed was that my colouring in has improved...LOL

Wonder what I will find on my wanders next year............................

Sunday 17 October 2010

A whole day...

...of colouring-in **bliss**

Saturday was Andy's (Pinnacle Crafts) "Copic & Promarker" workshop. Andy had a group of 8 ladies with various levels of experience in using these pens so we started with a printed image that folk could 'play' with. I love Andy's classes because he has a very easy teaching style and there is always something new to learn or a new tip to share.

This was our 'play' image...not really the sort of thing I would use but it allowed the chance to play with light sources to achieve dimension on a flat surface. It is surprising how one gets used to the way ones own pens are stored - on more than one occasion I reached for a colour and I couldn't find it 'cos the pens were arranged in a different order - I think next time I will take my own pens, which should make things a little easier. I was quite pleased with the urn but the flowers are not really my thing.
Another thing I love about the workshops at Pinnacles is the fact that you get to play with items that you don't have or would be reluctant to buy unless you can see whether you would actually make use of them. During the course of the day we made two cards using stamped images from the "Flower Soft" Christmas/Winter stamp range and we got to play with a couple of the newer Martha Stewart punches.
The 'side-stepper' card was made using 290 weight white card as the base, some silver miri, Kanban winter scene card, blue miri and one of the new Basic Grey embossing folders. The stamped image was coloured using both Copic & Promarker pens then the figures were glazed using Glossy Accents and the snow was Ice Stickled.
The easel card was again made out of 290 weight white card. The inside of the card was lined with some snowflake PP and the 'bar' was cut from the blue miri (two layers to give depth) using the new snowflake trim punch - blue flatback gems decorate the centre of the snowflakes. The front of the card was covered in another Kanban winter card design.
The stamped image on this card was coloured just using Copics and once cut out it was glazed all over with Glossy Accents. Once dry, I used normal Stickles (diamond) to bling up the furry bits on the figure's outfit...think I was a little heavy-handed with the stickles as it is almost impossible to see the colour/design underneath...oops, LOL.

Andy said it was one of the quietest classes he had taken - everyone was so engrossed in their colouring.

I had a lovely day and am so pleased that I have a few more of his classes booked...the November 'Tim' day is going to involve inking, embossing and grunge all to create something for Christmas in the Tim Holtz style...with an Andy twist. Hurry up November LOL..............................

Wednesday 13 October 2010

More Christmas...

...Blog Candy.
Go lookee here This lovely batch of Christmas goodies is up for grabs over on the Scrapology blog.

Such a lovely selection......................

Monday 11 October 2010

What do I think of my...

...ATG.

Having now had a chance to sit and have a play I can see why folk rave about this gadget. I wouldn't say I am at the 'love it' stage yet...but we are getting there LOL.

Despite its size and the fact that I have dodgy wrists I had no problem holding it - it is surprisingly light even with a full reel of tape inside. I'm not yet wizzing away with it but I am achieving smooth strokes which result in quicker crafting COS THERE IS NO BACKING PAPER TO HAVE TO TAKE OFF...Yeh!!!

The thing that took me a little bit of time to get used to was the trigger action. You place the ATG on the surface you want to apply 'sticky' to, squeeze the trigger and pull towards you. You then release the trigger and pull up from the item to 'break' the run of tape. This was the bit I kept forgetting and ended up with a few stringy messes of tape cos the ATG was still delivering. I think I have it sussed - SQUEEZE...PULL...RELEASE...LIFT.

After playing for a bit I used it to make a start on a Birthday Card book - quick, easy and no bits of tape backing everywhere. I'm still getting used to how close to the edge the tape delivers but that will come with practice and it will follow gentle curves without too much of a problem.

Would I have paid full price for this...not sure (still getting used to it).

Am I glad I have it...yes!

Recommendations; if you are thinking about one of these but are still uncertain - after all, it is a lot of money for a DST gun - try and find someone who has one so you can have a go. I think you will be plesantly surprised by the weight and handling of the item but it is still a case of how it feels for the individual when actually crafting. If you can 'try before you buy' that is great otherwise if you are able to treat yourself...go on, go for it..............................

Saturday 9 October 2010

Wednesday...

...6th October.

Despite the forecast stating good weather, the day started grotty & wet. It was a good job that I was booked onto this months card workshop at Dawn's (Dawn Bareham) cos I really didn't want to be commuting in that grotty weather.

It was also a good job that there was only a small class as the marquee decided to spring a few leaks...so after a quick spell of musical chairs LOL we all settled down to get stuck in.

We usually make around 4 cards at one of these workshops and this time the theme (apart from Christmas) was "back to basics" i.e. stamping, colouring, stencils and a bit of decoupage.

The four cards included a book card, an easel, a tent fold and a standard fold.
The tent fold included the making of a shaker box, some stamping/colouring and decoupage - the teddy is such a cute stamp. The easel used a metal stencil and pearl paste to create the front image. The standard fold had a bit of decoupage, lots of crystal glitter and gold gel pen used to create the finished effect.

At least one card on these workshops is rather involved and on most occasions we start to panic as to whether we will get everything finished...I don't know why, because we never have a problem - perhaps Dawn has more faith in us than we do LOL.

This last picture shows the card that we started the day with - a picture book card. The idea is fabulous and could be adapted for so many different occasions, however, we seemed to be taking rather a long time getting this done as it involved stamping, colouring, decoupage, glazing and a bit of construction work.
The card opens out to display a number of framed images.

All the stamps used were Penny Black and most of the backing papers came from My Craft Studio CDs. The metal stencil was from one of the current DoCraft Christmas ranges (not sure which one; could be Classic or Poinsettia).

Next month will be the last workshop for the year so in effect it is our "Christmas Workshop"...not wishing the year to fly by any quicker but.............can't wait to see what we are making this year.....................................

I've found...

...a super Christmas Craft site.
Here is a link to the Shabby Art Boutique - a blog that from 1st Oct to 24th Dec concentrates on all things Handmade for Christmas. I found it when blopping from the Christmas Planner site that I was lucky enough to be shown on last year.

Both sites can be accessed from links over on my righthand bar.

Go take a look, there are some fab ideas, free printables and stuff galore.............

Wednesday 6 October 2010

Okay, so I never claimed...

...to be the brightest spark in the pack LOL

Taking my new ATG to the card workshop was not the most clever of things to do. An intense workshop that requires concentration on what is being made is not the place to try out a new toy.

I think I have got the general process on squeezing the trigger and pulling towards me down to a fine art...I just need to remember to release the trigger before trying to lift & break away LOL (strands of DST without any backing is pretty mucky stuff).

Me thinks I'll play with this in the quiet of my own home until I get a little more used to it..................................

Monday 4 October 2010

I think I got a bargain...

...don't you?

For just £15 I got myself one of these...

So many crafters rave about these tape guns that I thought I would give it a go and started having a look around. Boy the prices varied - anything from £25 to nearly £40. At those prices I was tempted to give it a miss.

Chatting in my local craft store the other day I mentioned ATGs and Helen said she had one somewhere that she had never taken out of the box - a bit of rummaging and this ATG700 came to light...the box still sealed. She said if I was interested I could have it for £15...well, what could I say (LOL)...................

Sunday 3 October 2010

Time to get started on...

...Christmas.

Folks over on UKS have produced the most wonderful Advent houses using a product that they got from Tesco. I missed out on these the year before last and last Christmas I never saw any in my local stores **pouts - not happy**. What I forgot was that about 18 months ago I used a completed loyalty card to purchase this...

A Karen Foster Countdown Calendar. How could I have forgotten LOL - I'll tell you how, it was buried under a load of stash. "Surely not!" I hear you all cry...uuummmmmmm, yep - I have to hold my hand up and admit that I have more than a little stash and lack of storage means I am very bad at keeping stuff straight and remembering all those wonderful 'must have' goodies that I have acquired.

Well this treasure I have unearthed and I will be turning it into my Christmas Advent box for this year. My biggest problem now is to decide how I am going to decorate it.

I have some super Kaiserkraft PPs that would give it a distressed Victorian feeling or some BoBunny PPs that would make it feel more frosty/snowy. I just have to make the choice.

I promise to show you pics of what I decide and how it progresses................

Saturday 2 October 2010

2nd of October...

...already - eeeeek!!!

Whilst I have made a start on the Christmas cards I haven't really thought about anything else. Looking back to posts a couple of years ago I had been on a roll with the matchbox advent chests - gosh just how many of those did I make LOL I had also made some flip-over "sleeps 'til Christmas" calendars.

What have I made this year?

Nowt...zilch...NOTHING!!!

Better get my finger out or at this rate it will be Easter before you know it LOL....................................................